Monday, August 28, 2017

Gold Lace Leaf Thank You


Hello everyone,
So it is no big secret that I adore anything Concord & 9th comes out with.  With that being said, this beautiful stamp set, Lace Leaf, is one of my favorite.  My mom asked me to make a Thank you card for her and this set came to mind immediately. I started by die cutting a panel of Neenah Solar White 80 lb card stock with the largest stitched rectangle die from Kat Scrappiness and then stamping my leaf image with Tsukineko Brilliance Galaxy Gold Dew Drop ink and it was everything I was hoping it would be.  I stamped the Thank You sentiment from the MMH July 2017 Hero Arts kit, it is such a pretty font and perfect for this image.  I wanted to keep this card simple so I took some gold embroidery thread and wrapped it around my white card stock a few times and secured it on the back with some tape, then I laid the white panel onto a black 4 1/4 x 5 1/2 piece of black card stock and then put that onto an A2 sized, side folding, white card base.  To finish it off I used some Studio Katie mixed sized Sparkling Crystals scattered on the leaf image.
Hope you have enjoyed this card, see you soon!
Close Up, aren't those sparkling crystals pretty with the gold ink?


Saturday, August 26, 2017

Herd You Had A Birthday


Hello everyone,

My blog post at Victorine Originals went up and I am here to share my cute cow card! I am in love with this little image and think she is fabulous and needed a card dedicated to her. Plus I just love cows and cannot get enough of them, especially when they are this cute!  


I started with a piece of Neenah Solar White card stock that I die cut with a stitched rectangle die from Kat Scrappiness.  I then took the Victorine Originals Cow Background and stamped in clear versa mark ink, going from top left down to the bottom right corner and then sprinkled with black embossing powder and heat set.  I then cut out a circle with the MFT Peek-A-Boo Circle Window Die-Namics set. I popped up the top piece of my card with fun foam along the backside and then stamped my cow on a piece of white Neenah Solar White card stock. I used black versa fine ink and heat set with clear embossing powder to match the shininess of the cow spots on the front, then I took a light grey Zig Clean Real Brush marker and lightly colored the cow, I then used my Spectrum Noir Glitter Brush pen in Clear and coated the cow, because everything is better with glitter.  I attached the top cow background piece to a piece of black card stock that was 4 1/4 x 5 1/2 and attached that to a side folding A2 white card base.  The sentiment is from the MFT set "The Whole Herd" and I think it is perfect for the card. I added some clear confetti sequins and that finished up the card.
Hope you find this little cow as cute as I do.


Please check out my social media links listed below and the blog over at Victorine Originals and join us for the challenge going on right now, here is the inspiration board: 


See you all soon


SuprFox Designs Instagram

Cow Background

Cow (74374-C)

Friday, August 25, 2017

Soft Colors Make Pretty Thank You's


 Hello everyone,
Today I am sharing this card I made using Neat & Tangled's Calathea Stamp Set.  My mom had called and asked for a thank you card and since I know the recipient I wanted to make it custom for her tastes as well.  I actually ended up making two cards that I feel would be appropriate and will let my mom decide.
I started with a piece of Neenah Solar White card stock in 80 lb weight, which I then die cut with the largest stitched rectangle from the Kat Scrappiness dies. I took Lake Shores Simon Says Ink and stamped the full leaf stamps randomly on the paper and then took Wet Cement from Hero Arts and stamped the inside detail to the leaves. I then used Lawn Fawn Black Licorice ink that I stamped off once and then used the 2nd generation to stamp the stem areas.  I used the AESOP sentiment in the set and stamped that using the Lawn Fawn Black Licorice ink.  I placed the white rectangle on top of a piece of black card stock cut to 4 1/4 x 5 1/2, which I then added to a side folding A2 sized, white card base.  I finished the card off by adding some clear confetti sequins around the leaves and love the soft look of the card overall.
Hope you enjoy & I will see you all again soon!


Monday, August 21, 2017

Monochromatic Magic - Day 4 MFT Camp Create


 Hello everyone,
So sometimes we all need a reminder to just smile and using a simple color palette makes this a simple and fun card.  I started with a dark grey card stock and cut it down so the front piece measures 3" x 4 1/4" and then I used the MFT Die-namics mini fringe die and cut out 4 different colors in the black/grey color palette and layered them from darkest to lightest from the bottom to top.  At the top I found the perfect sentiment from a Honey Bee sentiment set and finished my card off with some clear confetti sequins.  I plan to use this as a gift card when I need to add something to a birthday gift bag to give it some added pizzazz.
Hope you enjoyed,  See you soon


Delightful Die Cutting - Day 5 MFT Camp Create


Hello everyone,
For Day 5 I went with a simple and understated look.  I pulled out one of my favorite sets from MFT, "Grateful for You" and die cut the word "grateful" out of black card stock, then I found this pretty piece of purple card stock from my crafty stash and die cut the edge with a large scalloped & stitched border die.  I attached the purple piece to an A2 size white card base and then attached my die cut, I then added a layer of Spectrum Noir Sparkle Glitter pen in clear over the letters which you can pick up in the above photo.  Then I stamped the additional sentiment from the same set in Lawn Fawn Black Licorice ink and added some clear confetti and my card is all complete.  I had originally made 2 other cards but they just did not want to work for me, so they went to the round can.  I am so glad in this case the third time was the charm.  Thanks for checking out my day 5 entry.
See you all soon


Friday, August 18, 2017

Wings of a Butterfly


Hello everyone,
The challenge at Victorine Originals starts today.  I have to say I love this stamp from the Wings Set and the detail is amazing.


I tried to incorporate the colors and title and touch on the aspects of the design as much as possible.

I started with a piece of card stock in my craft room that was light blue with a cloud design at the bottom and that was my inspiration.  I cut that down to A2 size (4 1/4 x 5 1/2) and then worked on the butterfly.  I original stamped on a piece of vellum with versafine embossing ink and then heat set with white embossing powder.  Then I re-stamped the versafine again and coated it with holographic embossing powder and heat set. In real life it sparkles and is just so pretty, hard to catch in pictures. Then I fussy cut the butterfly out leaving a small border. I flipped over the butterfly and colored the backside with Copic markers (E34, C9, B24, YG17) to match the colors for the challenge. I then cut the butterfly out of heavy weight dark grey card stock and glued the two together for added strength and to let the color shine through. I also layered foam squares under the wings to give added height and dimension to the butterfly and card design.  I stamped the beautiful "Remember me..." from the same set in Hero Arts "Wet Cement" ink at the bottom in the clouds.

I then added some Nuvo Glitter Drops in Silver Moondust for some added detail to the card and used Nuvo Crystal Drops in Ebony Black for the butterfly body.  
I adhered my finished panel to a white A2 card base.


I sure hope you join and enter the challenge over at the Victorine Blog, link below as well as links to their Social Media sites and Shop


                                     Victorine Originals Store
                              Victorine Originals Facebook Page
                                  Victorine Originals Pinterest
                                 Victorine Originals Instagram

See you all soon!
https://victorine-originals.myshopify.com/products/wings-set-unmounted-only

Thursday, August 17, 2017

Background Bonanza- MFT Camp Create Day 3


Hello everyone,
For MFT's Camp Create Day 3 we are supposed to focus on a background. So I did a card already but according to my husband it did not really fit the bill (in his eyes) he said the background was not very obvious.  So back to the drawing board and I came up with this card.  And no worries, I will blog my other card soon as I love how it turned out.
And I can always use extra cards around for those need it now moments.
So for this card I used the TH Stripes stencil and TH Distress Oxides in Peacock Feathers and Wilted Violet just interchanging them.  I love these colors together and this background is so yummy! I then die cut my watercolor card stock with a large stitched rectangle die and placed it on a piece of 4 1/4 x 5 1/2 black card stock which I then attached to an A2 sized white card base.  I then used a set of TH die cut words that I had in my crafty stash and cut out the sentiment using black card stock in a square and attached with a small amount of liquid glue to the front of the card. I was going to keep it all straight, but as I was laying it out I liked it a little crooked, so I went with it.... good thing I don't have OCD when it comes to things having to be straight all the time.
I look forward to seeing you all soon.


Magnificent Masking- MFT Camp Create 2017- Day 2


Hello everyone,
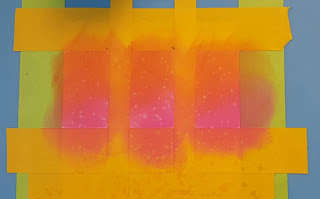
For Day 2 at Camp Create I masked off the 3 squares on my white card stock that I had die cut with the Kat Scrappiness large rectangle scalloped die and then ink blended with TH Distress Oxide Inks in Spiced Marmalade and Picked Raspberry.

Masked off ready to go

Inked and spritzed
After inking I spritzed a fine mist of water on the card stock from about 12 inches above and then blotted off with a paper towel.
Final product


When dry I then took the balloons, presents and hat stamps from the BB Beary Special Birthday stamp set and using Versamark ink stamped the images then heat embossed with fine detail white embossing powder.

Inside the presents I added some white gel pen dots and in all three images I used Wink of Stella for some added glitter.  I then used Black Licorice Lawn Fawn ink and stamped the sentiment along the bottom using the Happy Birthday from the MFT Birthday Wishes and Balloon stamp set . I placed the die cut portion on a piece of black card stock cut to 4 1/4 x 5 1/2 and placed both onto an A2 white card base. I then liberally placed some clear confetti around the images and that finished off the card.
I needed a birthday card for my aunt and this is perfect! I cannot wait to get it in the mail.
See you all soon.


Tuesday, August 15, 2017

Hello Beautiful


Hello everyone,
For the MFT Camp Create 2017 Day 1 - Inlaid Made Easy I have made this super easy, yet very pretty Hello card.  I started with a piece of dark grey card stock and die cut the edges with the largest Kat Scrappiness Scalloped Rectangle Die. I then placed my card stock into my MISTI and stamped the "beautiful" sentiment using the Honey Bee Beautiful Life Stamp Set, isn't that such a pretty font? I then took the Big Hello Die from MFT and laid it on my card stock and die cut it with my Sizzix, don't forget to keep the little piece from the center of the O.  I absolutely LOVE this die and use it every chance I get.  I then found a scrap of white card stock I had used to practice foiling on.  This piece was originally white card stock that I used transfer gel on then foiled with silver foil.  For this project I pulled out my new Black Soot Distress Oxide Ink and inked the card stock and spritzed liberally with water for that trademark oxide finish, then I wiped off any possible ink from the foil and cut it out with the Big Hello Die again. I then placed my dark grey piece down on an A2 sized side folding card base in black and then pieced in the die cut foiled pieces to create the card.  For finishing touches I added Nuvo Crystal Drops in Ebony Black and sprinkled IndigoBlu Unicorn Sparkle on top while they were wet.  I wish that photos could show just how pretty the foil is in real life.  This card came out so pretty for using a rather limited color pallet, but I rather like the direction it went.

See you soon


Saturday, August 12, 2017

Snail Mail - Thinking of You


Hello everyone,
So excited for my first official post as a DT Member for Victorine Originals.

I made a quick and simple card using the Mini Animals and Flowers (10548-X) from Victorine Originals. These little critters are so cute and versatile and I saw this little snail and thought a Thinking of You card would be perfect.  I started with a 3 x 3 piece of Neenah Solar White 80 lb card stock and stamped the snail in TH Distress Oxide Peacock Feathers (OMG, this color is so pretty!) then I added the Thinking of You sentiment from my crafty stash and wanted to showcase more of that beautiful color, so dug around in my big box of stencils and found this distressed bubble one and added some more ink to the top left of my white panel.  I then cut out a 3 1/4 x 3 1/4 square of Poppy colored paper to mat my snail piece onto.  I put it all onto an A2 sized piece of grey card stock and added some glitter washi tape down the side for a bit more interest. These colors really pop and are so pretty together. 


These Mini Animals and Flowers stamps are so versatile and cute from Victorine and I love how this card turned out.  Please check out my social media links listed below and the blog over at Victorine Originals and join us for the challenge going on right now, here is the inspiration board:  
No automatic alt text available.
See you all soon


SuprFox Designs Instagram

Mini Animals and Flowers (10548-X)

Monday, August 7, 2017

A Confession and a Thank You


Hello everyone,
So I have a confession.... I absolutely LOVE stationary and pens! I mean really LOVE them, always have..... so when my dad gave me this beautiful Swarovski pen as shown in the photo above, he deserved a beautiful hand made thank you note.  Masculine cards are a little harder for me to design and yes this has flowers, but I went with blue and kept it pretty simple overall.  I stamped the new Hero Arts bouquet from the July stamp set (summer flowers)/kit in black Versafine ink on Neenah Solar White card stock that I then cut with the largest of the Kat Scrappiness Fancy Scalloped Rectangle dies. I then took a post it note that has sticky over the whole thing and die cut with the matching die the flower bouquet. I then laid the post it over my stamped image and used TH Distress Oxide in Peacock Feathers (OMG, what a gorgeous color!) over the image with an ink dauber.  I removed the post it and had the perfect coloring.  I then stamped the Thank You from the same Hero Art set and attached the white panel to an A2 side folding light grey card base. I added some pretty light blue sequins from my stash and finally I took the cute bow stamp from the Hero Art kit and stamped it on a piece of scrap white card stock and colored it with my water brush and the same Peacock Feathers, die cut it and put it on my card, then I coated it with some glossy accents for shine and dimension.
I love the way this turned out and am hoping my dad enjoyed getting some home made happy mail as well.
*I saw this card idea from Jess Crafts YouTube Video showcasing the Hero Arts kit for July 2017 and really liked it although she used a piece of stencil material and I used a post it for my mask. She deserves credit for the great simple card idea, as it is a great one and would make easy to mass produce cards I believe*
Hope you enjoy, see you all soon!
 Up close to show off that glossy accents and beautiful Peacock Feathers color!